
Your Mac is acting up, and before you visit a service centre for a quick fix, consider using Apple Diagnostics, a built-in tool that helps detect hardware problems on your Mac.
This step-by-step guide will show you how to use Apple Diagnostics to efficiently identify any potential hardware issues, saving you time and possibly even money on repairs.
What is Apple Diagnostics?

Apple Diagnostics, formerly known as Apple Hardware Test, is a built-in tool on Macs that can diagnose problems with your computer’s hardware. This includes components like the logic board, memory, and even wireless functionality. Apple Diagnostics can identify potential hardware issues, suggest solutions for fixing the problems, and help you get in touch with Apple Support if needed.
Importance of Apple Diagnostics for troubleshooting hardware issues
Apple Diagnostics stands as a crucial asset for Mac users grappling with hardware troubles, boasting several key advantages.
- Firstly, its built-in nature eliminates the need for additional downloads or internet connectivity, ensuring swift access for on-the-spot diagnostics.
- Secondly, its precision in targeting specific hardware malfunctions streamlines the troubleshooting process, saving users precious time and effort compared to broader approaches like general troubleshooting.
- Moreover, beyond merely flagging issues, Apple Diagnostics often offers actionable solutions and facilitates seamless communication with Apple Support for further assistance.
- By catching hardware issues early, users can proactively mitigate potential damage or data loss, underscoring its significance in maintaining the health and longevity of Mac systems.
Overall, Apple Diagnostics is a valuable tool for Mac users to diagnose and potentially resolve hardware issues themselves or with Apple’s help.
Troubleshooting Common Hardware issues using Apple Diagnostics
Here are some ways in which Apple Diagnostics proves invaluable in diagnosing common hardware issues:
- Memory Problems: When facing unexpected shutdowns, application crashes, or sluggish performance, your Mac may be experiencing memory issues. Apple Diagnostics can identify these problems by presenting reference codes associated with memory-related errors.
- Storage Issues: Detection of errors related to hard drives or SSDs can indicate impending failure. Apple Diagnostics flags such issues by generating reference codes linked to storage devices, alerting users to potential problems with their storage hardware.
- Logic Board Problems: As the central component of your Mac, issues with the logic board can lead to various symptoms. Apple Diagnostics detects anomalies within the logic board or its components, providing reference codes that point to potential problems within this critical hardware.
- Wireless Connectivity Problems: Troubles with Wi-Fi or Bluetooth connections can disrupt productivity. Apple Diagnostics assists by identifying hardware-related issues affecting wireless connectivity and offering reference codes for further diagnosis.
It’s important to note that while Apple Diagnostics is a valuable tool, it may not always pinpoint the precise cause of a problem. In cases of complex hardware issues or unclear reference codes, it’s advisable to seek assistance from Apple Support or an authorized service provider for comprehensive resolution.
Preparing to Run Apple Diagnostics
When preparing to diagnose your Mac, ensuring a seamless process is essential. Follow these steps to optimize your setup before initiating the diagnostics test:
- Disconnect External Devices: With the exception of essential peripherals like the keyboard, mouse, display, Ethernet connection (if in use), maintain a clean slate by disconnecting all other external devices.
- Ensure Proper Placement: Place your Mac on a flat, stable surface in a well-ventilated area to facilitate optimal performance and prevent overheating during the diagnostic process.
- Establish Internet Connection: If possible, connect your Mac to the internet. This enables the diagnostic tool to transmit data to Apple for more detailed analysis and tailored advice based on your system’s status.
- Power Adapter Connection: To prevent interruptions due to battery issues, ensure your Mac is plugged into the power adapter throughout the diagnostic procedure.
By adhering to these preparatory steps, you can enhance the efficiency and effectiveness of the diagnostic process, facilitating smoother troubleshooting and more accurate results.
How to access Apple Diagnostics
There are two ways to access Apple Diagnostics on your Mac, depending on your Mac model and whether it starts up normally:
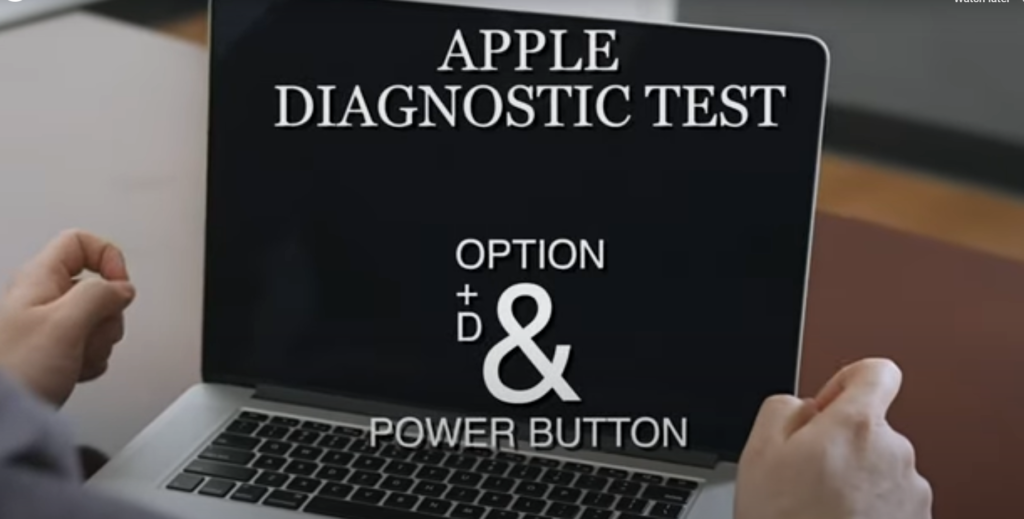
Using the power button and key combination
 Source image
- Turn off your Mac completely.
- Locate the power button. On Mac laptops with Touch ID, the power button is the same as the Touch ID button.
- Press and hold the power button. As you hold it, your Mac will start to turn on.
- Release the power button when you see the startup options window appear. This window might show the internal disk icon and a gear icon labeled “Options.”
- For Intel-based Macs: While still holding the power button, press and hold the “D” key on your keyboard. Release the D key when you see a progress bar or are prompted to choose a language.
- For Apple silicon Macs: Continue holding the power button until you see the startup options window, then press and hold “Command (⌘)-D” on your keyboard.
Accessing Apple Diagnostics through the startup menu
- Turn off your Mac completely.
- Press and hold the power button along with the “Option (⌥)” key on your keyboard.
- Release both keys when you see the startup manager window appear.
- You might see an option labeled “Apple Diagnostics” or “Apple Hardware Test.” Use the arrow keys on your keyboard to select it.
- Press “Enter” to start the diagnostics.
In both methods:
- Apple Diagnostics will run a series of tests on your Mac’s hardware.
- The tests may take a few minutes to complete.
- Once finished, Apple Diagnostics will display the results, which might include reference codes.
Understanding the Apple Diagnostics interface
Apple Diagnostics offers a fairly straightforward interface, but here’s a breakdown of what you might encounter:
Exploring the menu options, test results and reference codes
Menu Options (if available):
- Test Your Mac: This is the default option that runs a thorough scan of your Mac’s hardware.
- Get Help Online: This option might launch your web browser to Apple’s support page, where you can find resources related to the reference codes generated by the tests.
- Shut Down: This option shuts down your Mac.
Test Results:
- Once the tests are complete, you’ll see a message indicating whether any problems were found.
- If there are issues, you’ll likely see a reference code. This code helps identify the specific hardware component causing the problem.
- In some cases, Apple Diagnostics might suggest repair actions or recommend contacting Apple Support.
Understanding Reference Codes:
- Reference codes are alphanumeric codes that provide specific information about the hardware issue detected.
- Unfortunately, there’s no universal list of reference codes, as they can vary depending on your Mac model and the specific problem.
Understanding the Test Results
Once the test is complete, Apple Diagnostics will present reference codes if it finds issues. These codes can be used to understand specific problems:
- ADP000: No issues found.
- CNW003, CNW004, CNW007: Issues with Wi-Fi connections.
- PPT001: The battery should be checked; it may need to be replaced.
- NDD001, NDD003: Possible issue with USB devices (external & internal).
Each code provides a clear indication of what might be wrong. Additionally, you’ll receive suggestions for next steps, which might include contacting Apple Support, visiting an Apple Store, or contacting an authorized service provider.
What to Do After Running Diagnostics
- Follow the recommendations: Apple Diagnostics provides solutions like contacting support or servicing your Mac.
- Check for software updates: Sometimes, hardware issues are exacerbated by outdated software.
- Consider a professional assessment: If problems persist, professional advice may be necessary.
Conclusion
Using Apple Diagnostics is a straightforward way to self-assess hardware issues on your Mac. This powerful tool can save you both time and effort in dealing with hardware malfunctions, potentially helping you avoid unnecessary visits to a technician. Whether you’re a long-time Mac user or new to macOS, knowing how to perform this diagnostic check is a valuable skill that can help maintain your device’s longevity and performance.
Final Thoughts
Remember, regular maintenance and diagnostics are key to keeping your Mac running efficiently. By familiarizing yourself with tools like Apple Diagnostics, you’re better prepared to handle and troubleshoot issues, ensuring your Mac stays in top working condition.